“`html
What Trim Tab Actuators Actually Do
Trim tab actuators have gotten complicated with all the misconceptions flying around. They’re hydraulic or electric devices — small ones, mounted on your aircraft’s tail — that move control surfaces so you’re not wrestling the control column all flight long. Your hands would otherwise be doing that work forever. When they work right, you barely know they exist. That’s exactly how it should be.
Cockpit feel matters more than most pilots admit. A responsive trim actuator gives you real confidence that the aircraft wants to fly straight. A sticking one? It adds fatigue, creates doubt, and worst case, prevents you from correcting an uncommanded pitch or roll during approach or landing.
Early Warning Signs You’ll Feel in the Cockpit
I learned about trim actuator failure the way most pilots do — by noticing something was off before it actually broke. Frustrated by vague handling characteristics, I eventually figured out the pattern. Here are the signatures you need to catch early:
- Resistance increasing — The trim wheel or switch demands more physical effort than normal. Where it used to spin smoothly, now it catches. Dead zones appear in the control response. This means internal corrosion or contaminated hydraulic fluid is creating drag inside the actuator.
- Jerky, stepped movement — Instead of smooth deflection, the trim surface moves in chunks. You command trim and nothing happens for a half-second, then it jumps. Mechanical binding from rigging drift or corroded actuator rods causes this. It’s especially noticeable when you need gradual pitch control during approaches — when you absolutely don’t need surprises.
- Lag on control inputs — You activate trim and the surface response lags behind. In smooth air it’s a minor annoyance. In turbulence or during maneuvering flight, lag compounds pilot workload because you’re constantly correcting overshoot or undershoot.
- Asymmetric behavior — One side of a dual-actuator system moves freely while the other binds. This creates uncommanded rolling tendencies or unequal control feel. You notice it immediately if you’re paying attention during a turn, and you should be.
Why They Stick During Maneuvers
Probably should have opened with this section, honestly. It’s the core problem pilots actually care about.
Trim actuators don’t fail evenly — they fail under load. Maneuvers create load. During a 2G turn or a firm pitch correction, structural loads increase dramatically. The actuator rod experiences higher friction. Hydraulic fluid, if it’s contaminated with water or particulates, becomes more viscous under pressure. The rod moves slower or doesn’t move at all.
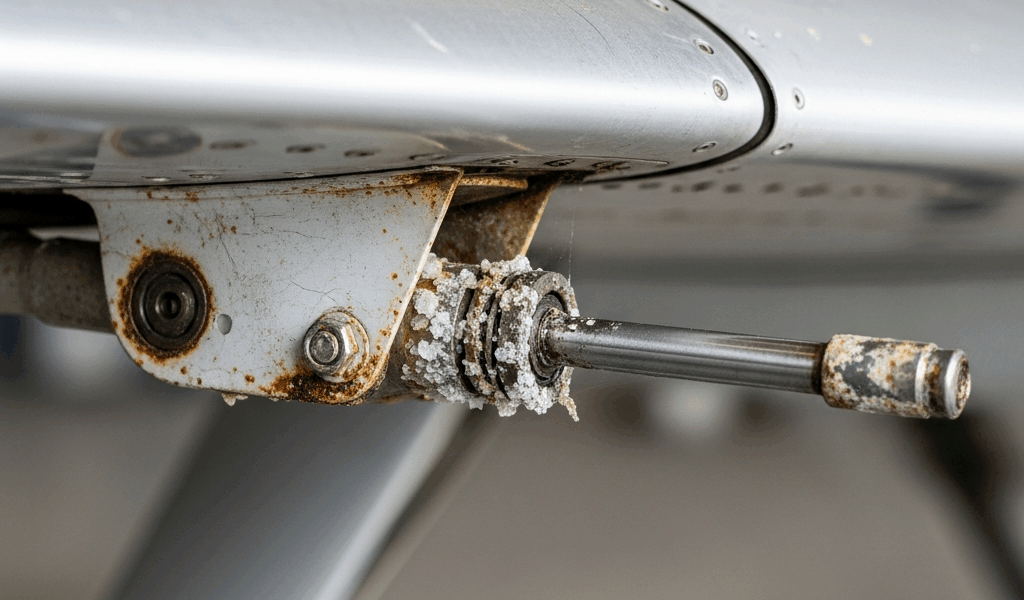
Salt corrosion is the biggest culprit in coastal operations. The actuator rod is chrome-plated steel. Saltwater intrusion, even in trace amounts, initiates pitting underneath the chrome layer. The pits grow. Corrosion products flake off and contaminate the hydraulic fluid itself. Under normal flight speeds and G-loads, you might not feel it. But push the aircraft into a steep climb or a hard bank, and suddenly the actuator rod is fighting against the corrosion layer plus the hydraulic pressure. It sticks.
Moisture does the same thing slower. An aircraft stored outdoors in humid climates, even with engine plugs in, will accumulate condensation in the actuator cavity. I’ve seen cases where the actuator was ground-serviceable but became unreliable the moment a pilot requested hard maneuvering flight. That was years ago, but I remember the surprise on the maintenance tech’s face.
Mechanical binding from rigging drift is different entirely. The control surface has a specific neutral position. Over hundreds of flight hours, rivets loosen, brackets shift fractionally. The trim tab, which should move within precise tolerances — usually 0.030 inches clearance on each side — starts rubbing the stop blocks or the fuselage skin. The actuator has to overcome static friction from the physical binding, not just internal hydraulic resistance. High-speed flight magnifies this because aerodynamic loads on the tab increase exponentially.
Thermal expansion happens in-flight. Your actuator and its connecting rod are exposed to different temperatures than the fuselage. During high-speed cruise at altitude, the rod cools while the hydraulic fluid is warm from circulation. The metal contracts slightly. Clearances tighten. Then you pitch down to descend and aerodynamic heating reverses it. The rod expands. If there’s already mild corrosion or contamination, these thermal cycles create micro-sticking events — small, reproducible, and getting worse each flight.
Ground Checks Before Flight
Pre-flight trim actuator inspection isn’t magic. It’s methodical work that takes fifteen minutes if you know what you’re looking for.
Visual inspection. Walk to the tail with a flashlight. Look at the actuator body and rod. Corrosion appears as white or gray crusting. Fresh chrome looks silver-gray. Corroded chrome looks dull or has visible pitting — tiny dark spots like an orange peel texture. Salt corrosion is aggressive and unmistakable. If you see any on the rod, escalate to maintenance immediately.
Check the actuator mounting. Bolts loose? Rod bent or dented? Hydraulic fluid weeping from the rod seal is a red flag. Fluid around the actuator coupling means internal seal degradation. Don’t fly the aircraft.
Tactile check. Before engine start, manually command trim using the wheel or switch (if your aircraft allows manual deflection without electrical power). Feel the resistance. It should be smooth and consistent through the entire range of motion — no catches, no stutter. If you’ve flown this aircraft before, you know what normal feels like. Trust that knowledge.
Pressure-testing actuator feel is crude but real. Use moderate pressure — you’re not trying to force it; you’re confirming even resistance. Any point where resistance spikes means mechanical binding or internal contamination. Mark it and report it.
Functional check with power. After engine start, command trim nose-up and nose-down. Watch the control surface move through a window or use a ground observer. Movement should be immediate and smooth. The surface should hold position when you release the trim switch. If the surface drifts back after release, the actuator has internal leakage or a stuck spool valve — that’s a problem.
Timing matters. Full deflection should take 8–15 seconds depending on aircraft type. Faster than 5 seconds might mean a hydraulic malfunction or rigging interference causing non-normal acceleration. Slower than 20 seconds suggests contaminated or degraded hydraulic fluid. I’ve seen Cessna 210 actuators that took 18 seconds at full deflection and still flew fine, but that’s borderline.
Dual actuators (found on larger aircraft) must move in sync. Watch both. If one is visibly slower than the other, asymmetric friction is present. That’s a maintenance item before you fly.
When to Ground the Aircraft
There’s a line between acceptable aging and unairworthy condition. Know where it is.
Red-line failures. Ground immediately if:
- Trim actuator does not respond to control input at all. Complete mechanical failure or internal blockage.
- Hydraulic fluid leaking visibly from rod seals. Loss of fluid means loss of control authority within minutes or hours of flight.
- Corrosion pitting on the actuator rod is deep enough to see with the naked eye and covers more than 10% of the visible rod surface. Remaining chrome layer is compromised.
- Trim surface does not return to neutral after commanded deflection. Sticky spool valve or internal contamination preventing flow reversal. You cannot trim the aircraft precisely.
- Jerky, stepped motion during functional check. This indicates imminent mechanical binding and will worsen in flight.
These require actuator replacement or overhaul before any flight. Period.
Deferrals and continued operation. Minor corrosion discoloration on the rod (no pitting), smooth control response with slightly elevated resistance, and proper holding of trim position after deflection are acceptable under Minimum Equipment List deferrals for many aircraft. Your POH and aircraft-specific guidance will spell out what’s allowed. Deferral depends on:
- Aircraft certification level (Part 23, 25, or experimental).
- Flight plan (local day VFR is more forgiving than IFR or over-water).
- Maintenance interval until next inspection opportunity.
My rule: if you’re unsure, ask maintenance. A 30-minute consultation beats a 2-hour emergency descent because a sticking trim actuator degraded mid-flight under maneuvering load. Don’t make my mistake — I once pushed an aircraft with borderline trim resistance on a coastal flight, and the actuator finally locked up during descent through 3,000 feet. That was not fun.
Document everything. If you felt resistance during pre-flight, note it in the logbook. Trend the data. If resistance is increasing flight-to-flight, that’s your signal to remove the aircraft from service before a red-line condition develops. Maintenance thrives on trends, not single-event reports.
Trim actuators are designed to fail slowly and predictably — if you pay attention. Stick to the checks, trust your instincts about control feel, and you’ll catch trouble before it catches you.
“`




Stay in the loop
Get the latest aviate ai updates delivered to your inbox.